Проекционный телевизор на основе DLP Mitsubishi Electric WD-65738 | |||||
| |||||


Характеристики и обзор |
| Color flashing through shades of purple, and there is a strange sound coming from back of the TV. Can start anywhere between 15 minutes and 5 hours after TV was turned on. Diagnosed as a color wheel problem. 11/13/2012 The color wheel was replaced. Distortion is gone. Colors actually appear to be brighter and more vivid. 11/10/2014 Update: TV is still working great. The parts were replaced by the technician. I believe he said the entire color wheel unit was replaced. |
| SOLD! for $1,400 (plus $458.58 shipping from the East Coast to the West Coast) Mitsubishi WD-65838: Keep in mind that Mitsubishi will no longer manufacture a flagship 65". So, this is the last one. It retails for $2,699. Model hierarchy: 65" 838 Series: WD-65838 FLAGSHIP 2011 (Out of stock everywhere) 738 Series: WD-65738 638 Series: WD-65638 C10 Series: WD-65C10 I purchased my WD-65838 from an authorized dealer, Electronics-Expo. The Square-Trade warranty will last until October 24, 2014. Video Features: ISFccc® ADVANCED VIDEO ADJUSTMENTS DEEP COLOR™ AND X.V.COLOR™ 6-COLOR PROCESSOR 120Hz SUB-FRAME RATE SMOOTH 120Hz FILM MODE PLUSH1080p™ (Version 5G) EDGE ENHANCE™ DARK DETAILER™ DEEPFIELD IMAGER™ PERFECTCOLOR™ & PERFECTINT™ INTEGRATED HDTV TUNER VIDEO NOISE REDUCTION Audio Features: 16 SPEAKER IMMERSIVE SOUND PROJECTOR TECHNOLOGY iSP CALIBRATION MICROPHONE (INCLUDED!) BLUETOOTH® A2DP AUDIO STREAMING LEVEL SOUND |
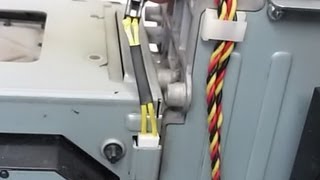
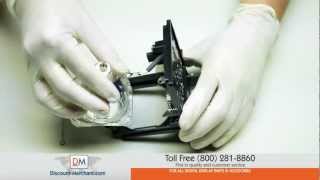
| How to easily replace your DLP Chip in Mitsubishi DLP TVs. Repair tutorial is for a 276P595010 DLP Chip replacement. Purchase a DLP Chip -- Grab a DLP Chip Installation Kit -- The Kit includes: - 1 thermal pad - 1 poly glove - 1 lint-free microfiber cloth This video is designed to be a guide for testing and troubleshooting your TV repair. Please note that other complications may exist that aren't addressed in this guide. While we always strive to provide accurate and detailed information, we can't guarantee that it will fix your TV's issues. If you have any questions, please contact us at [email protected] or (877) 881-6492. *Warranty and shipping prices may vary. Please see product page on our website for more information!* ..................................................................................... Need tech support? - Call our award-winning Customer Service Team: (877) 881-6492 - Email us: sales(at)shopjimmy.com - Get tech support: Follow us: Facebook -- Twitter -- ..................................................................................... The DLP Chip shown in this video is a compatible replacement for the following DLP Rear Projection TV parts and models: Part Numbers: - 4719-001997 - 4719-001985 - 4719-001999 TV Models: - MITSUBISHI WD-57733 - MITSUBISHI WD-57734 - MITSUBISHI WD-57833 - MITSUBISHI WD-60638 - MITSUBISHI WD-60733 - MITSUBISHI WD-60735 - MITSUBISHI WD-60737 - MITSUBISHI WD-60738 - MITSUBISHI WD-60833 - MITSUBISHI WD-60837 - MITSUBISHI WD-60C8 - MITSUBISHI WD-60C9 - MITSUBISHI WD-65638 - MITSUBISHI WD-65731 - MITSUBISHI WD-65733 - MITSUBISHI WD-65734 - MITSUBISHI WD-65735 - MITSUBISHI WD-65737 - MITSUBISHI WD-65738 - MITSUBISHI WD-65833 - MITSUBISHI WD-65837 - MITSUBISHI WD-65838 - MITSUBISHI WD-65C8 - MITSUBISHI WD-65C9 - MITSUBISHI WD-73638 - MITSUBISHI WD-73640 - MITSUBISHI WD-73733 - MITSUBISHI WD-73734 - MITSUBISHI WD-73735 - MITSUBISHI WD-73736 - MITSUBISHI WD-73737 - MITSUBISHI WD-73738 - MITSUBISHI WD-73833 - MITSUBISHI WD-73835 - MITSUBISHI WD-73837 - MITSUBISHI WD-73838 - MITSUBISHI WD-73840 - MITSUBISHI WD-73C11 - MITSUBISHI WD-73C8 - MITSUBISHI WD-73C9 - MITSUBISHI WD-75837 - MITSUBISHI WD-82737 - MITSUBISHI WD-82738 - MITSUBISHI WD-82838 - MITSUBISHI WD-C657 - MITSUBISHI WD-Y577 - MITSUBISHI WD-Y657 - SAMSUNG HL50A650C1FXZA - SAMSUNG HL56A650C1FXZA - SAMSUNG HL61A650C1FXZA - SAMSUNG HL61A750A1FXZA - SAMSUNG HL67A750A1FXZA - SAMSUNG HLT5055WX/XAA - SAMSUNG HLT5076SX/XAA - SAMSUNG HLT5087SX/XAA - SAMSUNG HLT5676SX/XAA - SAMSUNG HLT5687SAX/XAA - SAMSUNG HLT5687SX/XAA - SAMSUNG HLT5689SX/XAA - SAMSUNG HLT6156WX/XAA - SAMSUNG HLT6176SX/XAA - SAMSUNG HLT6187SAX/XAA - SAMSUNG HLT6187SX/XAA - SAMSUNG HLT6189SX/XAA - SAMSUNG HLT6756W - SAMSUNG HLT6756WX/XAA - SAMSUNG HLT7288WX/XAA - TOSHIBA 57HM167 - TOSHIBA 65HM167 Be sure to unplug your TV before starting any repairs. Unscrew and remove the bottom panel from the back of your TV. Remove all cables from the light engine. Take care not to use excessive force when removing cables. Exact locations of cables will vary depending on TV. Remove the screws holding the light engine in place. Carefully remove the light engine from the TV. Remove the lens shroud by removing the corresponding screws. Take care not to touch the lens. Remove all cables from the DMD board. Remove the DMD board housing screws. Remove the back half of DMD board housing from the bottom. Remove the DMD board screws. Make sure to support the board as you remove the final screws. Remove the DMD board from the light engine. Release the DLP chip heatsink by removing the corresponding screws. Remove the heatsink. Remove any remaining DMD board screws. Remove the DMD board from the front housing. Unlock and remove the DLP chip from the DMD board. Before installing the new DLP chip, please verify that it is equivalent in appearance to the original DLP chip, and that all part numbers are compatible. Compatible part numbers are listed on all relative ShopJimmy product pages. Remove all fingerprints and dust from the glass surface with a clean microfiber cloth. Install and lock your new DLP chip. Reinstall the DMD board into the front half of the housing. Reinstall the DLP chip heatsink. Reinstall DMD board onto the light engine. Reinstall the back half of the DMD board housing. Reinstall all DMD board cables on the lens side. Take care not to damage any cables when reinstalling. Reinstall the lens shroud. Before reinstalling the light engine into your tv, please take a moment to verify all surfaces especially near the lens are clean and free of dust. ..................................................................................... TV Repair Made Easy™ © 2014 ShopJimmy.com, LLC. |
| mitsubishi wd-65738 price mitsubishi tv mitsubishi wd-73738 mitsubishi 60738 mitsubishi wd-65738 replacement lamp |
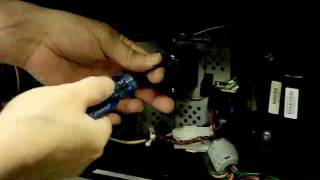
| Mitsubishi DLP TV Repair - Easy fix how to replace bulb - Common DLP TV Repair Lamp Replacement for 915B403001 Click to Purchase Your Lamp/Bulb: Click Here to Buy and ESD Wristband! • Up to 12-Month Warranty on Replacement Lamps & Bulbs!* • OEM & OEM-Compatible Options!* • See Product Page for complete details! • FREE Technical Support Tips! Call (877) 881-6492 This video is designed to be a guide for testing and troubleshooting your TV repair. Please note that other complications may exist that aren't addressed in this guide. While we always strive to provide accurate and detailed information, we can't guarantee that it will fix your TV's issues. If you have any questions, please contact us at [email protected] or (877) 881-6492. FOLLOW US: Twitter - @ShopJimmy - Facebook - ShopJimmy.com - ..................................................................................................... The bulb and lamp shown in this video are replacements for the following DLP Rear Projection TV models: • MITSUBISHI WD-60735 • MITSUBISHI WD-60737 • MITSUBISHI WD-60C8 • MITSUBISHI WD-60C9 • MITSUBISHI WD-65735 • MITSUBISHI WD-65736 • MITSUBISHI WD-65737 • MITSUBISHI WD-65835 • MITSUBISHI WD-65837 • MITSUBISHI WD-65C8 • MITSUBISHI WD-65C9 • MITSUBISHI WD-73735 • MITSUBISHI WD-73736 • MITSUBISHI WD-73737 • MITSUBISHI WD-73835 • MITSUBISHI WD-73837 • MITSUBISHI WD-73C8 • MITSUBISHI WD-73C9 • MITSUBISHI WD-82737 • MITSUBISHI WD-82837 ..................................................................................................... Bulb replacement for Mitsubishi 915B403001 Lamp Brought to you by ShopJimmy.com. Visit www.shopjimmy.com to search the hundreds of thousands of TV parts in our inventory. To properly replace the bulb inside of your DLP Lamp, you will need the following materials. A Pair of latex gloves Replacement Bulb Needle nose pliers Cup to hold your screws and other small items. Flat head and phillips screwdriver A piece of tape or a sticker to use as a marker. Unscrew and remove the lamp door at the back of your TV. Loosen the screws on the back of the lamp and gently guide the lamp out of the TV keeping a firm grip on the handle. Release the lamp plug from the housing by removing the screw that surrounds the plug. Carefully unlock the plastic clips and slide the two pieces of housing apart. Pull the plug and wire harness out from the guides and plastic housing. Release the bulb from the housing by removing the screws and metal bulb clips. This lamp has two metal bulb clips. Make sure to note the locations of clips and orientation of the bulb within the housing and orientation of the wires. Guide the bulb away from the metal insert to remove the bulb from the housing. Before removing the wire harness from the bulb, mark one wire with a piece of tape or sticker and make a note so that you don't forget if you have marked the rear or side terminal connections of the wire harness. Release the rear bulb terminal by removing the nut and washer with a needle nose pliers. Release the side bulb terminal by removing the screw with a phillips screwdriver. Prior to installing your new bulb, check both bulbs and verify they are equal. Reinstall the wire harness. Refer back to your notes to be confirm you have matched the terminal connections correctly and to make sure you have the wires pointing the correct direction. Guide the bulb back into the metal insert and the plastic housing. Reinstall the bulb clips and screws referring to your notes to verify that you are placing the clips in the correct locations. Reconnect the two halves of the housing. Make sure that all screw holes are in line and that all plastic clips are connected, prior to reinserting any screws. Slide the plug back in place and hold it in place with a screw. Well look at that you did it, your lamp is now ready to be reinstalled into your TV. Gently guide the lamp back into the TV keeping a firm grip on the handle. Tighten all screws until they are hand tight. Reinstall the lamp door and tighten the door screw. Plug in your TV and turn the power on and your Shopjimmy replacement bulb will light up immediately. Need tech support? - Call our award-winning Customer Service Team: (877) 881-6492 - Email us: sales(at)shopjimmy.com - Live Chat with us: TV Repair Made Easy™ © 2012 ShopJimmy.com, LLC. |
|
Просмотров: 82667 Ключевые слова:
Общая оценка Mitsubishi Electric WD-65738 на TV-sovet.ru:
2
из
5
на основании
39 голосов.
|
Что спрашивают чаще всего после покупки |
|
Видеообзор Mitsubishi Electric WD-65738 | |
| |
Отзывы о Mitsubishi Electric WD-65738 |
Другие модели Mitsubishi Electric |
Взгляните | |||||
|


Попробуйте найти |


